Toyota Corolla (E210) 2019-2025 Owners Manual / Vehicle specifications / Specifications / Tire information
Toyota Corolla (E210): Tire information
Typical tire symbols
Full-size tire
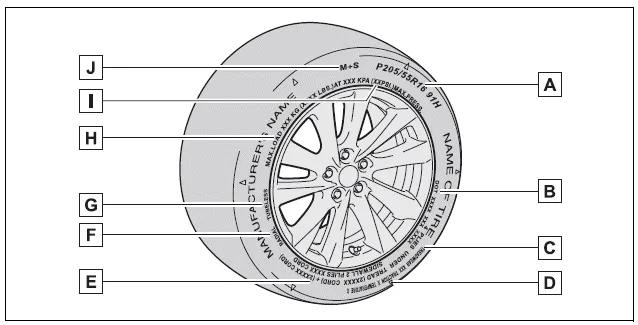
- Tire size
- DOT and Tire Identification Number (TIN)
- Uniform tire quality grading For details, see "Uniform Tire Quality Grading" that follows.
- Location of treadwear indicators
- Tire ply composition and materials Plies are layers of rubber-coated parallel cords. Cords are the strands which form the plies in a tire.
- Radial tires or bias-ply tires A radial tire has "RADIAL" on the sidewall. A tire not marked "RADIAL" is a bias-ply tire.
- TUBELESS or TUBE TYPE A tubeless tire does not have a tube and air is directly put into the tire. A tube type tire has a tube inside the tire and the tube maintains the air pressure.
- Load limit at maximum cold tire inflation pressure
- Maximum cold tire inflation pressure This means the pressure to which a tire may be inflated.
- Summer tires or all season tires
An all season tire has "M+S" on the sidewall. A tire not marked "M+S" is a summer tire.
Compact spare tire
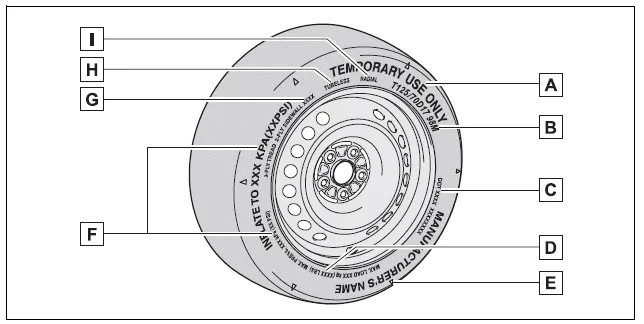
- "TEMPORARY USE ONLY" A compact spare tire is identified by the phrase "TEMPORARY USE ONLY" molded on its sidewall. This tire is designed for temporary emergency use only.
- Tire size
- DOT and Tire Identification Number (TIN)
- Load limit at maximum cold tire inflation pressure
- Location of treadwear indicators
- Maximum cold tire inflation pressure This means the pressure to which a tire may be inflated.
- Tire ply composition and materials Plies are layers of rubber-coated parallel cords. Cords are the strands which form the plies in a tire.
- TUBELESS or TUBE TYPE A tubeless tire does not have a tube and air is directly put into the tire. A tube type tire has a tube inside the tire and the tube maintains the air pressure.
- Radial tires or bias-ply tires A radial tire has "RADIAL" on the sidewall. A tire not marked "RADIAL" is a bias-ply tire.
Typical DOT and Tire Identification Number (TIN)
Type A
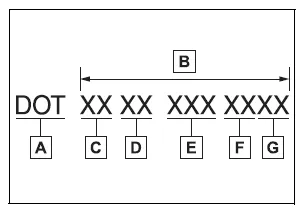
- DOT symbol*
- Tire Identification Number (TIN)
- Tire manufacturer's identification mark
- Tire size code
- Manufacturer's optional tire type code (3 or 4 letters)
- Manufacturing week
- Manufacturing year
*: The DOT symbol certifies that the tire conforms to applicable Federal Motor Vehicle Safety Standards.
Type B
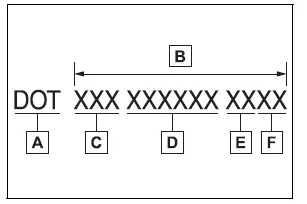
- DOT symbol*
- Tire Identification Number (TIN)
- Tire manufacturer's identification mark
- Manufacturer's code
- Manufacturing week
- Manufacturing year
*: The DOT symbol certifies that the tire conforms to applicable Federal Motor Vehicle Safety Standards.
Tire size
■ Typical tire size information
The illustration indicates typical tire size.
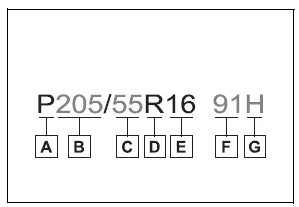
- Tire use (P = Passenger car, T = Temporary use)
- Section width (millimeters)
- Aspect ratio (tire height to section width)
- Tire construction code (R = Radial, D = Diagonal)
- Wheel diameter (inches)
- Load index (2 digits or 3 digits)
- Speed symbol (alphabet with one letter)
■ Tire dimensions
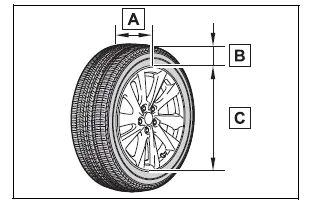
- Section width
- Tire height
- Wheel diameter
Tire section names
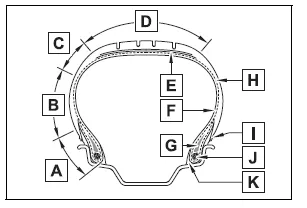
- Bead
- Sidewall
- Shoulder
- Tread
- Belt
- Inner liner
- Reinforcing rubber
- Carcass
- Rim lines
- Bead wires
- Chafer


Other materials:
Bluetooth® device registration status
1 Display the “Bluetooth* Setup” screen.
*: Bluetooth is a registered trademark of Bluetooth SIG, Inc.
2 Select the device.
3 Select “Device Info”.
4 Following screen is displayed:
1 Device Name
2 Change connection method
3 Bluetooth® Address
4 Display your telephone number
The n ...
Replacement
1. Remove hood sub–assy
2. Remove cylinder head cover no.2
3. Remove battery
4. Remove battery carrier
Remove the 4 bolts and battery carrier.
5. Remove air cleaner assembly with hose
6. Remove floor shift cable transmission control shift
Remove the nut from the control shaf ...
Replacement
1. Remove engine under cover rh
2. Remove fan and generator v belt
3. Remove generator assy
Disconnect the wire clamp from the wire clip on the rectifire
end frame.
remove the rubber cap and nut, and disconnect the alternator
wire.
disconnect the alternator connecto ...