Toyota Corolla (E210): Front seats
Adjustment procedure
Manual seat
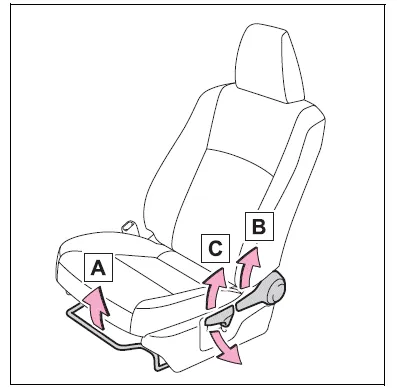
- Seat position adjustment lever
- Seatback angle adjustment lever
- Vertical height adjustment lever (driver's side only)
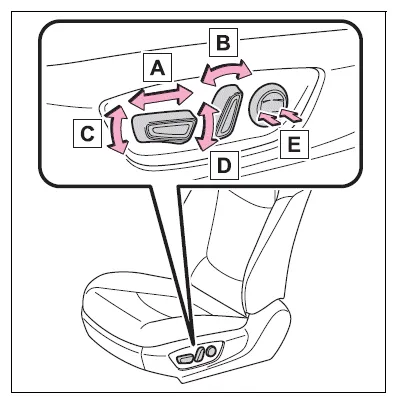
Power seat (driver's side only)
WARNING
■When adjusting the seat position
- Take care when adjusting the seat position to ensure that other passengers are not injured by the moving seat.
- Do not put your hands under the
seat or near the moving parts to
avoid injury.
Fingers or hands may become jammed in the seat mechanism.
- Make sure to leave enough space around the feet so they do not get stuck.
■Seat adjustment
- Be careful that the seat does not hit passengers or luggage.
- To reduce the risk of sliding
under the lap belt during a collision,
do not recline the seat
more than necessary.
If the seat is too reclined, the lap belt may slide past the hips and apply restraint forces directly to the abdomen, or your neck may contact the shoulder belt, increasing the risk of death or serious injury in the event of an accident.
Adjustments should not be made while driving as the seat may unexpectedly move and cause the driver to lose control of the vehicle.
- Manual seat only: After adjusting the seat, make sure that the seat is locked in position.
NOTICE
■When adjusting a front seat
When adjusting a front seat, make sure that the head restraint does not contact the headliner. Otherwise, the head restraint and headliner may be damaged.


Other materials:
Overhaul
1. Drain clutch fluid
2. Remove brake master cylinder sub–assy
3. Remove brake booster assy
4. Disconnect clutch reservoir tube
Loosen the clip and disconnect the clutch reservoir tube
from the clutch master cylinder assy.
Hint:
use a container to catch the fluid.
5. Disconnect ...
Rear wheel alignment
Inspection
1. Inspect tire
2. Measure vehicle height
Notice:
before inspecting the wheel alignment, adjust the vehicle height to the
specified value.
3. Inspect toe–in
Toe–in:
usa, canada:
Mexico:
If the toe–in is not within the specified value, inspect and replace
the susp ...
Inspection procedure
1 Inspect shift solenoid valve(s1)
Remove the shift solenoid valve s1.
measure the resistance according to the value(s) in the
table below.
Standard:
Connect the positive (+) battery lead to the solenoid connector
terminal, and the negative (–) battery lead to the
solenoid ...