Toyota Corolla (E210) 2019-2025 Owners Manual / When trouble arises / Steps to take in an emergency / If you have a flat tire
Toyota Corolla (E210): If you have a flat tire
Your vehicle is equipped with a spare tire. The flat tire can be replaced with the spare tire.
WARNING
■If you have a flat tire
Do not continue driving with a flat tire. Driving even a short distance with a flat tire can damage the tire and the wheel beyond repair, which could result in an accident.
Before jacking up the vehicle
- Stop the vehicle in a safe place on a hard, flat surface.
- Set the parking brake.
- Shift the shift lever to P.
- Stop the engine.
- Turn on the emergency flashers.
Location of the spare tire, jack and tools
Type A
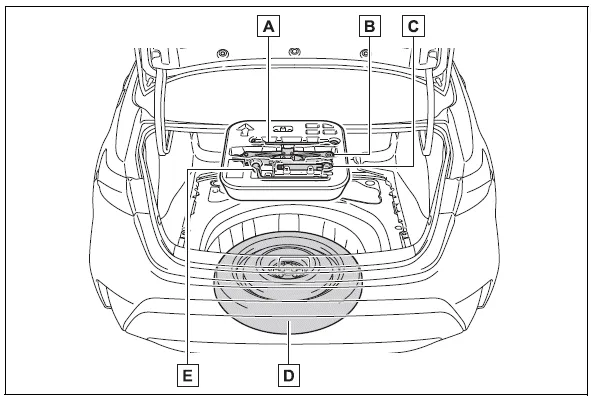
- Jack handle
- Jack
- Towing eyelet
- Spare tire
- Wheel nut wrench
Type B
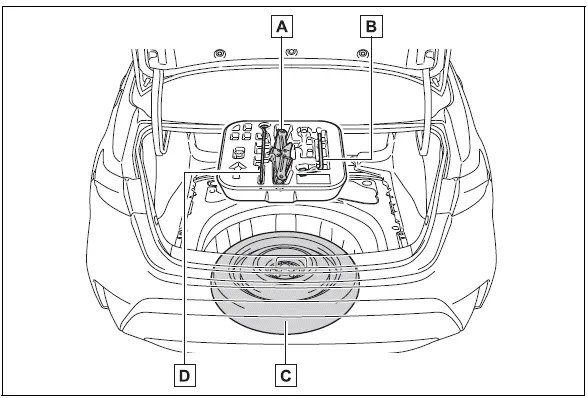
- Jack
- Wheel nut wrench
- Spare tire
- Jack handle
WARNING
■Using the tire jack
- Observe the following precautions.
Improper use of the tire jack may cause the vehicle to suddenly fall off the jack, leading to death or serious injury.
- Do not use the tire jack for any purpose other than replacing tires or installing and removing tire chains.
- Only use the tire jack that comes with this vehicle for replacing a flat tire. Do not use it on other vehicles, and do not use other tire jacks for replacing tires on this vehicle.
- Put the jack properly in its jack point.
- Do not put any part of your body under the vehicle while it is supported by the jack.
- Do not start the engine or drive the vehicle while the vehicle is supported by the jack.
- Do not raise the vehicle while someone is inside.
- When raising the vehicle, do not put an object on or under the jack.
- Do not raise the vehicle to a height greater than that required to replace the tire.
- Use a jack stand if it is necessary to get under the vehicle.
- When lowering the vehicle, make sure that there is no-one near the vehicle. If there are people nearby, warn them vocally before lowering.
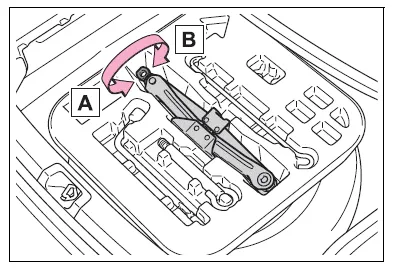
Taking out the jack
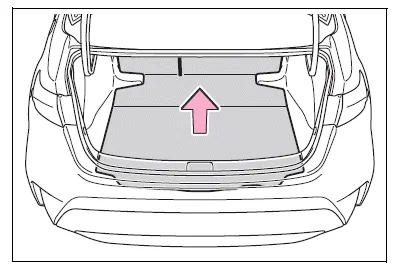
1. Remove the deck mat.
2. Take out the jack.
Type A
Type B
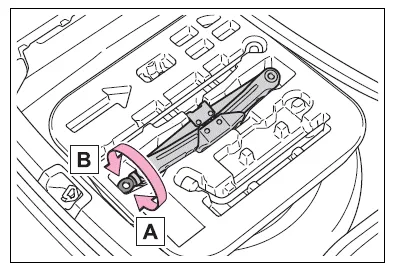
- For tightening
- For loosening
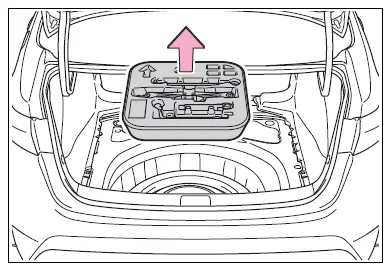
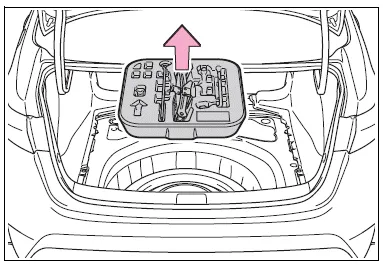
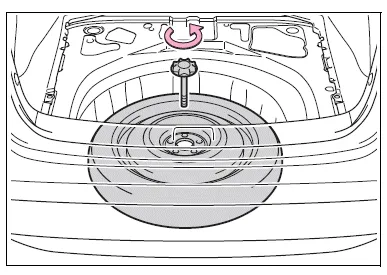
Taking out the spare tire
1. Remove the deck mat.
2. Remove the tool tray.
Type A
Type B
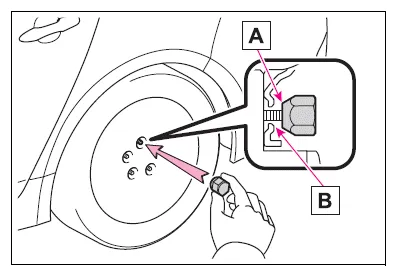
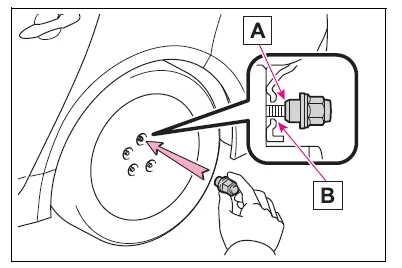
3. Loosen the center fastener that secures the spare tire.
WARNING
■When storing the spare tire
Be careful not to catch fingers or other body parts between the spare tire and the body of the vehicle.
Replacing a flat tire
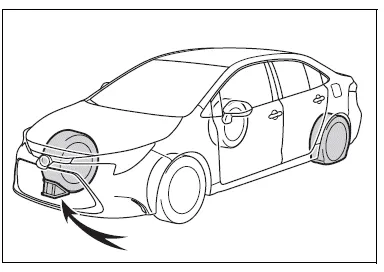
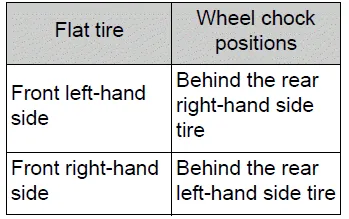
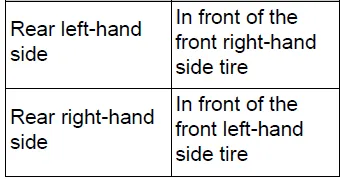
1. Chock the tires.
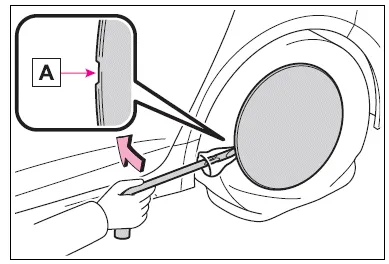
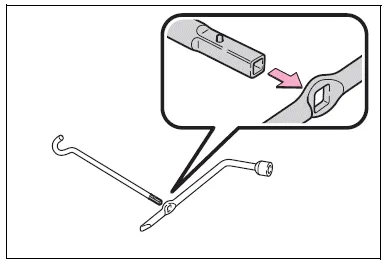
2. Vehicles with a steel wheel: Remove the wheel cap (if equipped) using the wrench.
Insert the wrench into the notch A on the wheel cap.
To protect the wheel cap, place a rag between the wrench and the wheel cap.
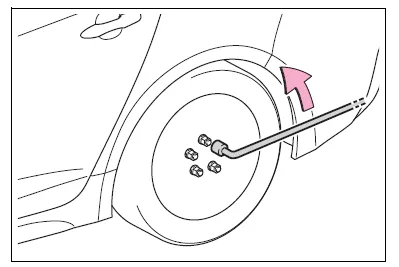
3. Slightly loosen the wheel nuts (one turn).
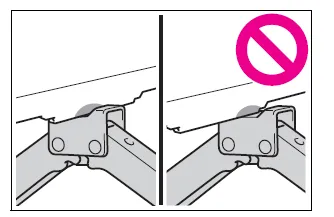
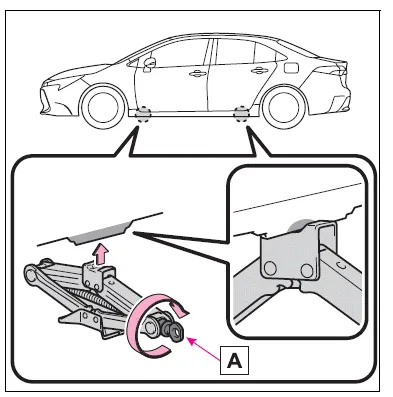
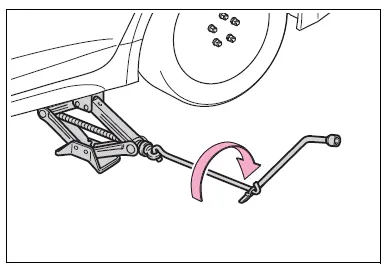
4. Turn the tire jack portion A by hand until the center of the recessed portion of the jack is in contact with the center of the jack point.
5. Assemble the jack handle extension.
Type A
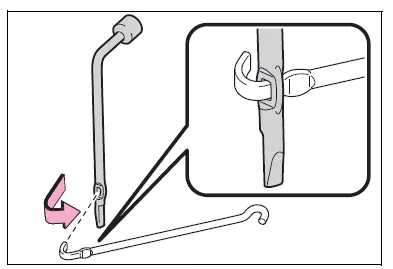
Type B
6. Raise the vehicle until the tire is slightly raised off the ground.
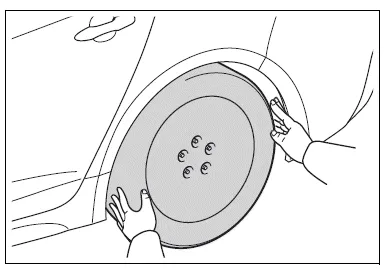
7. Remove all the wheel nuts and the tire.
When resting the tire on the ground, place the tire so that the wheel design faces up to avoid scratching the wheel surface.
WARNING
■Replacing a flat tire
- Do not touch the disc wheels or
the area around the brakes
immediately after the vehicle
has been driven. After the vehicle
has been driven the disc
wheels and the area around the
brakes will be extremely hot.
Touching these areas with hands, feet or other body parts while changing a tire, etc. may result in burns.
- Failure to follow these precautions
could cause the wheel
nuts to loosen and the tire to fall
off, resulting in death or serious
injury.
- Never use oil or grease on the wheel bolts or wheel nuts.Oil and grease may cause the wheel nuts to be excessively tightened, leading to bolt or disc wheel damage. Remove any oil or grease that has adhered when installing the wheel nuts.
- After replacing a tire, check the
tightening torque as soon as
possible.
Wheel nut torque: 76 ft-lbf (103 N-m, 10.5 kgf-m)
- Do not attach a heavily damaged wheel ornament, as it may fly off the wheel while the vehicle is moving.
- When installing a tire, only use wheel nuts that have been specifically designed for that wheel.
- If there are any cracks or deformations in the bolt screws, nut threads or bolt holes of the wheel, have the vehicle inspected by your Toyota dealer.
- When installing the wheel nuts, be sure to install them with the tapered ends facing inward.
Installing the spare tire
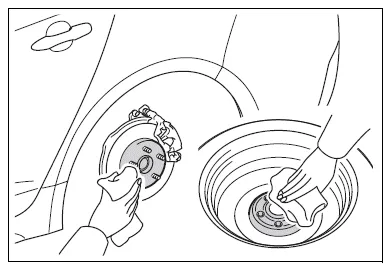
1. Remove any dirt or foreign matter from the wheel contact surface.
If foreign matter is on the wheel contact surface, the wheel nuts may loosen while the vehicle is in motion, causing the tire to come off.
2. Install the tire and loosely tighten each wheel nut by hand by approximately the same amount.
When replacing a steel wheel with a steel wheel (including a compact spare tire), tighten the wheel nuts until the tapered portion A comes into loose contact with the disc wheel seat B.
When replacing an aluminum wheel with a steel wheel (including a compact spare tire), tighten the wheel nuts until the tapered portion A comes into loose contact with the disc wheel seat B.
3. Lower the vehicle.

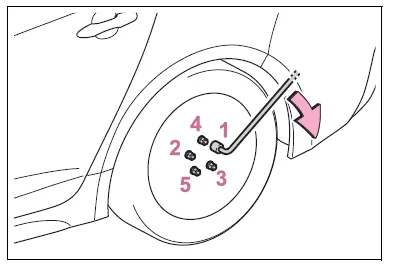
4. Securely tighten the wheel nuts two or three times in the order shown in the illustration using a wheel nut wrench.
Tightening torque: 76 ft-lbf (103 N-m, 10.5 kgf-m)
5. Stow the flat tire, tire jack and all tools.
■The compact spare tire
- The compact spare tire is identified
by the label "TEMPORARY USE ONLY" on the tire sidewall.
Use the compact spare tire temporarily, and only in an emergency.
- Make sure to check the tire inflation pressure of the compact spare tire.
■When the compact spare tire is equipped
The vehicle becomes lower when driving with the compact spare tire compared to when driving with standard tires.
■After completing the tire change (vehicles with a tire pressure warning system)
The tire pressure warning system must be reset.
■When using the compact spare tire (vehicles with a tire pressure warning system)
As the compact spare tire is not equipped with a tire pressure warning valve and transmitter, low inflation pressure of the spare tire will not be indicated by the tire pressure warning system. Also, if you replace the compact spare tire after the tire pressure warning light comes on, the light remains on.
■If you have a flat front tire on a road covered with snow or ice
Install the compact spare tire on one of the rear wheels of the vehicle.
Perform the following steps and fit tire chains to the front tires:
1. Replace a rear tire with the compact spare tire.
2. Replace the flat front tire with the tire removed from the rear of the vehicle.
3. Fit tire chains to the front tires.
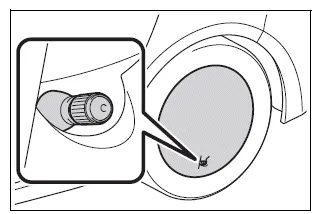
■When reinstalling the wheel cap (steel wheels except compact spare tire)
Align the cutout of the wheel cap with the valve stem as shown in the illustration.
WARNING
■When using the compact spare tire
- Remember that the compact spare tire provided is specifically designed for use with your vehicle. Do not use your compact spare tire on another vehicle.
- Do not use more than one compact spare tires simultaneously.
- Replace the compact spare tire with a standard tire as soon as possible.
- Avoid sudden acceleration, abrupt steering, sudden braking and shifting operations that cause sudden engine braking.
■When the compact spare tire is attached
The vehicle speed may not be correctly detected, and the following systems may not operate correctly:
- ABS & Brake assist
- VSC
- TRAC
- Automatic High Beam
- Dynamic radar cruise control
- EPS
- PCS (Pre-Collision System)
- LDA (Lane Departure Alert)
- LTA (Lane Tracing Assist)
- Tire pressure warning system (if equipped)
- BSM (if equipped)
- RCTA (if equipped)
- SEA (if equipped)
- Rear view monitor system
- Navigation system (if equipped)
■Speed limit when using the compact spare tire
Do not drive at speeds in excess of 50 mph (80 km/h) when a compact spare tire is installed on the vehicle.
The compact spare tire is not designed for driving at high speeds. Failure to observe this precaution may lead to an accident causing death or serious injury.
■After using the tools and jack
Before driving, make sure all the tools and jack are securely in place in their storage location to reduce the possibility of personal injury during a collision or sudden braking.
NOTICE
■Be careful when driving over bumps with the compact spare tire installed on the vehicle.
The vehicle becomes lower when driving with the compact spare tire compared to when driving with standard tires. Be careful when driving over uneven road surfaces.
■Driving with tire chains and the compact spare tire
Do not fit tire chains to the compact spare tire. Tire chains may damage the vehicle body and adversely affect driving performance.
■When replacing the tires (vehicles with a tire pressure warning system)
When removing or fitting the wheels, tires or the tire pressure warning valve and transmitter, contact your Toyota dealer as the tire pressure warning valve and transmitter may be damaged if not handled correctly.
■To avoid damage to the tire pressure warning valves and transmitters (vehicles with a tire pressure warning system)
When a tire is repaired with liquid sealants, the tire pressure warning valve and transmitter may not operate properly. If a liquid sealant is used, contact your Toyota dealer or other qualified service shop as soon as possible. Make sure to replace the tire pressure warning valve and transmitter when replacing the tire.


Other materials:
Inspection procedure
Hint:
troubleshoot each trouble symptom in accordance with the chart below.
1 Clear dtc
Connect the hand–held tester or the obd ii scan tool to the dlc 3.
turn the ignition switch on and push the hand–held tester or the
obd ii scan tool main switch on.
read the dtc . ...
Message Settings
1 Display the “Phone/Message Settings” screen. 2 Select “Messaging Settings”.
3 Select the desired item to be set.
1 Set automatic message transfer on/off.
2 Set automatic message readout on/off.
3 Set the SMS/MMS notification popup on/off.
4 Set the e-mail notification popup on/off.
5 ...
Evap monitor (vacuum pressure monitor)
Notice:
a cold soak must be performed prior to conducting the drive pattern to complete
the internal pressure
readiness monitor.
Cold soak preconditions
The monitor will not run unless:
mil is off.
Fuel level is approximately 1/2 to 3/4.
Altitude is 7800 feet (2400 m) or less.
...