Toyota Corolla (E170) 2014–2019 Owners Manual / Interior features / Connecting Bluetooth® (Multimedia system) / Registering a Bluetooth® device / How to register a Bluetooth® device
Toyota Corolla (E170): How to register a Bluetooth® device
1 Display the “Bluetooth* Setup” screen. *: Bluetooth is a registered trademark of Bluetooth SIG, Inc.
2 Select “Add”.
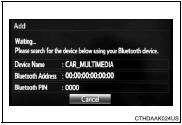
3 When this screen is displayed, search for the device name displayed on this screen on the screen of your Bluetooth® device.
For details about operating the Bluetooth® device, see the manual that comes with it.
To cancel the registration, select “Cancel”.
4 Register the Bluetooth® device using your Bluetooth® device.
A PIN-code is not required for SSP (Secure Simple Pairing) compatible Bluetooth® devices. Depending on the type of Bluetooth® device being connected, a message confirming registration may be displayed on the Bluetooth® device’s screen. Respond and operate the Bluetooth® device according to the confirmation message.
5 Check that this screen is displayed when registration is complete.

6 Select “OK” when the connection status changes from “Connecting...” to “Connected”.
If an error message is displayed, follow the guidance on the screen to try again.
Registration can be performed from screens other than the “Bluetooth* Setup” screen.
■ When registering from the “Bluetooth* Audio” screen
1 Display the “Bluetooth* Audio” screen. 2 Select “Select Device”.
3 Follow the steps in “How to registering a Bluetooth® device” from “STEP 2”.
*: Bluetooth is a registered trademark of Bluetooth SIG, Inc.


Other materials:
Inspection procedure
Hint:
when the throttle position is slightly opened (the accelerator pedal
is slightly depressed) because a
floor carpet is overlapped on the accelerator pedal, or if not fully
releasing the accelerator pedal, etc.,
Dtc p505 will possibly be detected.
Read freeze frame data using the ...
Windshield wiper motor assy
Replacement
1. Remove windshield wiper arm cover
2. Remove fr wiper arm rh
operate the wiper and stop the windshield wiper motor assy at the
automatic stop position.
remove a nut and fr wiper arm rh.
3. Remove fr wiper arm lh
remove a nut and fr wiper arm lh.
4 ...
Clutch
Preparation
Sst
Recomended tools
Equipment
Lubricant
...