Toyota Corolla (E210) 2019-2025 Owners Manual / Driving / Operating the lights and wipers / AHB (Automatic High Beam)
Toyota Corolla (E210): AHB (Automatic High Beam)
The Automatic High Beam uses a front camera located on the upper portion of the windshield to detect the brightness of the lights of vehicles ahead, streetlights, etc., and automatically changes the head lights between the high beams and low beams.
WARNING
■For safe use
Do not overly rely on the Automatic High Beam. Always drive safely, taking care to observe your surroundings and turning the high beams on or off manually if necessary.
■To prevent unintentional operation of the Automatic High Beam System
- When it is necessary to disable the system
Using the Automatic High Beam system
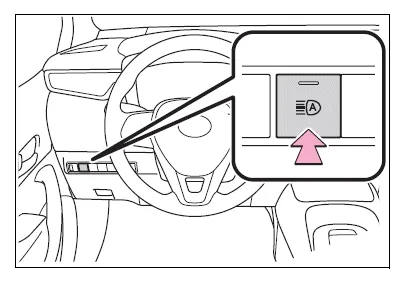
1. Press the Automatic High Beam switch.
2. Turn the headlight switch to
the  or
or
 position.
When the headlight switch lever is in the low beam position, the AHB system will be enabled and the AHB indicator will illuminate.
■Automatic operating conditions of the high beams
- When all of the following conditions
are met, the high beams will
illuminate automatically:
- The vehicle speed is approximately 21 mph (34 km/h) or more.
- The area ahead of the vehicle is dark.
- There are no vehicles ahead with lights on.
- There are few streetlights or other lights on the road ahead.
- If any of the following conditions
are met, the headlights will
change to the low beams:
- Vehicle speed drops below approximately 17 mph (27 km/h).
- The area ahead of the vehicle is not dark.
- There is a vehicle ahead with lights on.
- There are many streetlights or other lights on the road ahead.
■Front camera detection
- In the following situations, the high
beams may not be automatically
changed to the low beams:
- When a vehicle cuts in front of your vehicle
- When another vehicle crosses in front of the vehicle
- When vehicles ahead are repeatedly detected and then hidden due to repeated curves, road dividers or roadside trees
- When a vehicle ahead approaches from a far lane
- When a vehicle ahead is far away
- When a vehicle ahead has no lights
- When the lights of a vehicle ahead are dim
- When a vehicle ahead is reflecting strong light, such as own headlights
- Situations in which the sensors may not operate properly
- The headlights may change to the low beams if a vehicle ahead that is using fog lights without its headlights turned on is detected.
- House lights, street lights, traffic signals, and illuminated billboards or signs may cause the high beams to change to the low beams, or the low beams to remain on.
- The following may change the timing
at which the headlights
change to the low beams:
- The brightness of lights of vehicles ahead
- The movement and direction of vehicles ahead
- The distance between the vehicle and a vehicle ahead
- When a vehicle ahead only has lights illuminated on one side
- When a vehicle ahead is a two-wheeled vehicle
- The condition of the road (gradient, curve, condition of the road surface, etc.)
- The number of passengers and amount of luggage
- The headlights may change between the high beams and low beams unexpectedly.
- Bicycles and other small vehicles may not be detected.
- In the following situations, the system
may not be able to correctly
detect the brightness of the surroundings. This may cause the
low beams to remain on or the
high beams to flash or dazzle
pedestrians or vehicles ahead. In
such a case, it is necessary to
manually change between the
high beams and low beams.
- When there are lights similar to headlights or tail lights in the surrounding area
- When headlights or tail lights of vehicles ahead are turned off, dirty, changing color, or not aimed properly
- When the headlights are repeatedly changing between the high beams and low beams.
- When use of the high beams is inappropriate or when the high beams may be flashing or dazzling pedestrians or other drivers.
- When the vehicle is used in an area in which vehicles travel on the opposite side of the road of the country for which the vehicle was designed, for example using a vehicle designed for right-hand traffic in a left-hand traffic area, or vice versa
- When it is necessary to disable the system
- Situations in which the sensors may not operate properly
■Temporarily reducing front camera sensitivity (for the U.S.A.)
The sensitivity of the front camera can be temporarily reduced.
1. Turn the engine switch off with the following conditions met.
- The headlight switch is in the
or
 position.
 - The headlight switch lever is in the low beam position.
- The automatic High Beam switch is on.
2. Press the engine switch to ON.
3. Within 60 seconds after performing step 2, push the headlight switch lever to the high beam position then pull it to the original position quickly 10 times, then leave the lever in its original position.
Turning the high beams on/off manually
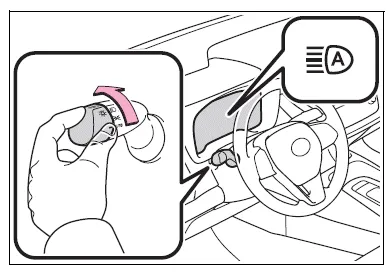
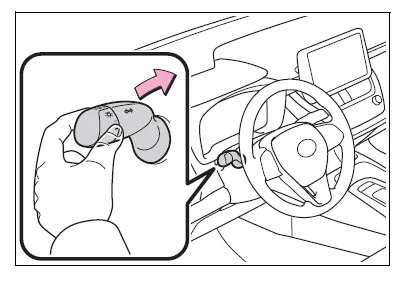
■ Changing to the high beams
Push the lever forward.
The Automatic High Beam indicator will turn off and the high beam indicator will turn on.
Pull the lever to its original position to enable the Automatic High Beam system again.
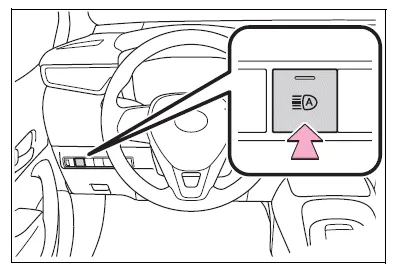
■ Changing to the low beams
Press the Automatic High Beam switch.
The Automatic High Beam indicator will turn off.
Press the switch to enable the Automatic High Beam system again.
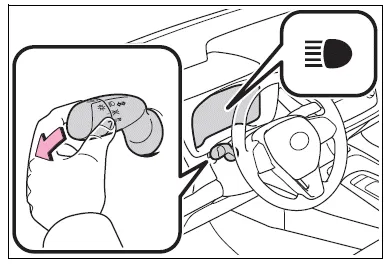
■ Temporarily changing to the low beams
It is recommended to switch to the low beams when use of the high beams is inappropriate or when the high beams may cause problems or distress to other drivers or pedestrians nearby.
Pull the lever rearward and then return it to its original position.
The high beams will illuminate while the lever is pulled, however, after the lever is returned to its original position, the low beams will remain on for a certain amount of time. After this, the Automatic High Beam system will operate.


Other materials:
Components
...
Listening to an iPod
Connecting an iPod enables you to enjoy music from the vehicle speakers. Press
until “iPod” is displayed.
Connecting an iPod
Control panel
1 Power
2 Volume
3 Fast-forward or reverse
4 Repeat play
5 Shuffle playback
6 Select an iPod menu/song or display song list
7 Displays text mess ...
Circuit description
The airbag sensor front lh circuit consists of the airbag sensor assy center
and airbag sensor front lh.
Dtc b1158/b1159/16 is recorded when malfunction is detected in the airbag sensor
front lh circuit.
Wiring diagram
...