Toyota Corolla (E210) 2019-2025 Owners Manual / Vehicle status information and indicators / Multi-information display (4.2-inch display) / Driving support system
information display
Toyota Corolla (E210): Driving support system information display
■ Driving support system information
Select to display the operational status of the following systems:
- LTA (Lane Tracing Assist)
- LDA (Lane Departure Alertl)
- Dynamic radar cruise control
■ Navigation system-linked display (if equipped)
Select to display the following navigation system-linked information:
- Route guidance to destination
- Compass display (heading- up display)
Audio system-linked display
Select to enable selection of an audio source or track on the meter using the meter control switches.
This menu icon can be set to be
displayed/not displayed in .
.
Vehicle information display
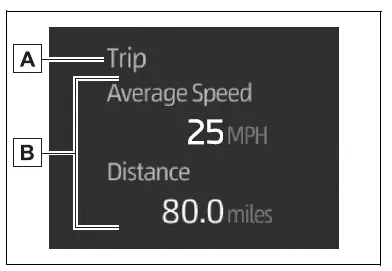
■ Drive information
Displays drive information such as the following:

- Drive information type
- Drive information items
Displays the following depending
on which drive information type and drive information items
were selected in .
.
- After start
- Distance: Displays the distance driven since engine start
- Elapsed time: Displays the elapsed time since engine start
- Average vehicle speed: Displays the average vehicle speed since engine start
- After reset
- Distance: Displays the distance driven since the display was reset*
- Elapsed time: Displays the elapsed time since the display was reset*
- Average vehicle speed: Displays the average vehicle speed since the display was reset*
*: To reset, display the desired item
and press and hold the  meter control switch.
Settings display
■ Meter display settings that can be changed
- Language
Select to change the language displayed. - Units
Select to change the units of measure displayed. - Eco Driving Indicator Light Select to enable/disable the Eco Driving Indicator Light.

- Fuel economy display
Select to change the average fuel consumption display between after start/after reset.
Select to display/not display the audio system linked display.
Select to change the displayed content of the following:
- Drive information type
Select to change the drive information type display between after start/after reset.
- Drive information items
Select to set the first and second items of the drive information display to any of the following: average vehicle speed/distance/elapsed time.
- Pop-up display
Select to enable/disable pop-up displays for each relevant system.
- Multi-information display off
Select to turn the multi-information display off.
To turn the multi-information display on again, press any of the following meter control switches
.
- Default setting
Select to reset the meter display settings to the default setting.
■Suspension of the settings display
- Some settings cannot be changed while driving. When changing settings, park the vehicle in a safe place.
- If a warning message is displayed, operation of the settings display will be suspended.
WARNING
■Cautions during setting up the display
If the engine is running when changing the display settings, ensure that the vehicle is parked in a place with adequate ventilation.
In a closed area such as a garage, exhaust gases including harmful carbon monoxide (CO) may collect and enter the vehicle.
This may lead to death or a serious health hazard.
NOTICE
■During setting up the display
To prevent battery discharge, ensure that the engine is running while setting up the display features.
Other materials:
Winter driving tips
Carry out the necessary
preparations and inspections
before driving the
vehicle in winter. Always
drive the vehicle in a manner
appropriate to the prevailing
weather conditions.
Pre-winter preparations
Use fluids that are appropriate
to the prevailing outside temperatures.
Engine oil
Engine c ...
USB Port/AUX Port
Connect an iPod, USB memory device or portable audio player to the USB/AUX
port as indicated below. Select “iPod”, “USB” or “AUX” on the audio source selection
screen and the device can be operated via multimedia system.
Connecting using the USB/AUX port
■ iPod
Open the cove ...
Pre–check
1. Diagnosis system
Release the parking brake lever.
check the warning lights.
When the ignition switch is turned on, check that the abs
warning light and brake warning light goes on for 3 sec.
Hint:
when the parking brake is applied or the level of the brake
fluid is low, the ...


