Toyota Corolla (E170) 2014–2019 Owners Manual / Maintenance and care / Do-it-yourself maintenance / Checking and replacing fuses
Toyota Corolla (E170): Checking and replacing fuses
If any of the electrical components do not operate, a fuse may have blown. If this happens, check and replace the fuses as necessary.
1 Turn the engine switch off.
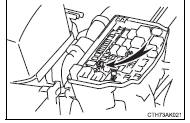
2 Open the fuse box cover.
► Engine compartment Push the tab in and lift the lid off.

► Under the driver’s side instrument panel Remove the lid.

3 Remove the fuse with the pullout tool.
Only type A fuses can be removed using the pullout tool.
4 Check if the fuse is blown.
1 Normal fuse
2 Blown fuse
Replace the blown fuse with a new fuse of an appropriate amperage rating.
The amperage rating can be found on the fuse box lid.
► Type A

► Type B

► Type C

■After a fuse is replaced
●If the lights do not turn on even after the fuse has been replaced, a bulb
may need replacement.
●If the replaced fuse blows again, have the vehicle inspected by your Toyota dealer.
■If there is an overload in a circuit
The fuses are designed to blow, protecting the wiring harness from damage.
CAUTION
■To prevent system breakdowns and vehicle fire
Observe the following precautions.
Failure to do so may cause damage to the vehicle, and possibly a fire or injury.
●Never use a fuse of a higher amperage rating than that indicated, or use any other object in place of a fuse.
●Always use a genuine Toyota fuse or equivalent.
Never replace a fuse with a wire, even as a temporary fix.
●Do not modify the fuses or fuse boxes.
NOTICE
■Before replacing fuses
Have the cause of electrical overload determined and repaired by your Toyota dealer as soon as possible.


Other materials:
How to scroll
: Select to scroll to the next or
previous page.
: If
appears to the right of titles, the
complete titles are too long for the display. Select this button to scroll the title.
Turn the “TUNE/SCROLL” knob to move the cursor box to select a desired item from
the list, and press the â ...
How to proceed with troubleshooting
1 Vehicle brought to workshop
2 Customer problem analysis
3 Check and clear dtc
4 Problem symptom confirmation
Symptom does not occur (go to
step 5)
5 Symptom simulation
6 Dtc check
7 Dtc chart
8 Problem symptoms table
9 Circuit inspection
10 Confirmation test
End
...
Stopping
► Automatic transmission or continuously
variable transmission
1 With the shift lever in D, depress the brake pedal.
2 If necessary, set the parking brake.
If the vehicle is to be stopped for an extended period of time, shift the shift
lever to P or N. (, 174, 176) ► Manual ...